Tag: Digital Marketing

  • Snapchat Mobile App Install Ads: Swiping Over Tapping

    screen-shot-2016-11-14-at-3-23-11-pm

    In an effort to expand its slice of the social media marketing pie, Snapchat is expanding into mobile app install ads. The theory behind lots of Snapchat advertising is that the user is more engaged on Snapchat as opposed to passively scrolling through their Facebook newsfeed thus more likely to remember and respond to an ad.

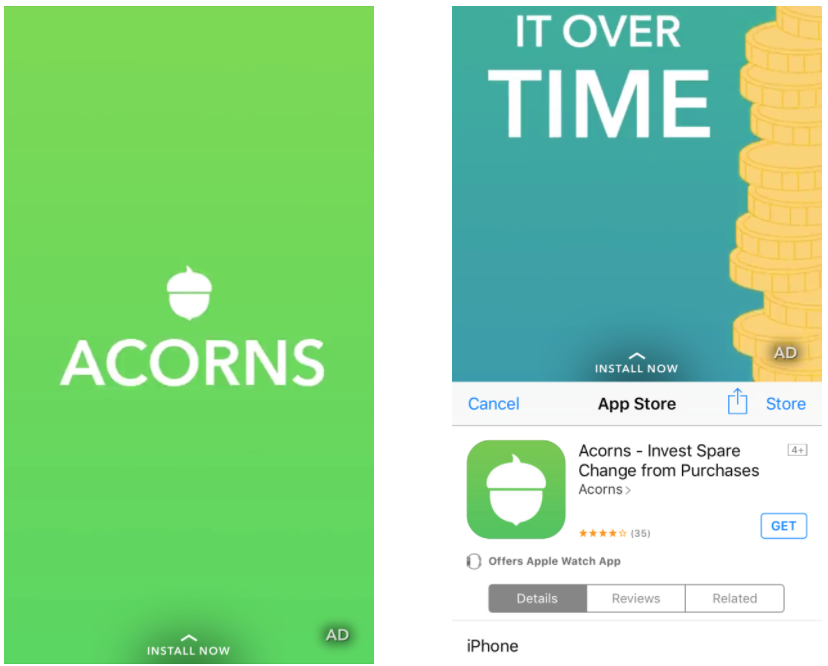
    Something that Snapchat has done that is a fresh new take on the app install ads is eliminating the need to *sigh* actually click the screen. With a simple swipe up, you’re already on the app download screen, which sounds small but in early tests is showing a huge return for advertisers. According to this Ad Age article, the micro investing app Acorns started running these Snapchat mobile app install ads and is seeing a 40% higher install rate than Facebook.

    Say what you will, but Snapchat has lowered the barrier of entry with these ad types. As small as it may appear, requiring a swipe vs a click, it is faster and requires no new screen to load. This is something that Facebook itself already knows, evidenced by ad types like Lead Ads and Canvas Ads that remove the need to click out of Facebook. Or even Instant Articles which are pre-cached to remove any unwanted load times.

    What may have started as a self-serving agenda by Facebook and others of keeping users on the social channels rather than clicking out to a website, is also seemingly having a huge positive impact on advertisers as it makes it even easier for users to respond and engage.

  • Split Testing is Now Available on Facebook

    screen-shot-2016-10-21-at-9-13-22-am

    Facebook is now starting to roll out Split Testing in Ads Manager, which is essentially an easier way to test different variables in ad campaigns to see which ones perform the best. In the past you would have to run separate ad sets to perform tests like this, but wasn’t necessarily a pure A/B test. This is something that Google AdWords has offered for some time, allowing campaigns to experiment and split test. It’s a much welcomed addition to the Ads Manager as one strategy, targeting method, or ad objective that works great for one campaign doesn’t necessarily work the same for others.

    So if you’re still having internal debates over whether this ad campaign should optimize for Website Clicks or Conversions, now you can run a split test and see which actually does the best. Learn what works the best for different campaigns and maybe you’ll unearth something totally unexpected.

    Have you ever wanted to easily test the same ad on two different audiences to see which performed better? Or maybe you’d like to figure out which optimization type yields the best results, optimizing for Conversions or Link Clicks? Advertisers run tests to identify the best ad performance on Facebook, Instagram and Audience Network and to understand how changes in different aspects of their ad can impact ad performance. Tests like this need to be set up fairly so that advertisers can understand the true impact of their ad strategies on the performance of their ads.

  • Snapchat Updates to Stories and Discover Will Massively Effect Advertisers

    screen-shot-2016-09-15-at-10-04-48-am
    Snapchat just made some huge changes that users may not initially notice, but advertisers definitely will. The Discover tiles have been moved down from their previous perch at the top of the Stories screen to somewhere much lower down the feed. Discover is where most big name advertisers buttered their bread with everything from ESPN and NFL updates, MTV hyping new artists or TMZ talking about the latest Kardashians news.

    They were attractive and they were prominent. I found myself perusing Discover much more when it moved over to the tiles within Stories rather than when it was on its own tab originally. Now with the tiles moved much further down the screen it has many advertisers worried.

    Oh well, these things happen. Remember how infuriated brands were when Facebook significantly pared down organic reach? Well then Promoted Posts came out and they became the biggest arbitrage advertising had seen in a long time. Then those got paired down and out came the massively underpriced Facebook Video and so on and so on.

    Fear not though, Snapchat isn’t going to just abandon one of its best ad products without any kind of new features or improvements. And it seems like that may be coming as a result of Snapchat’s other update – Snapchat Playlist. Previously users could go to their Stories and just go through all their friends automatically, as soon as one story ended, Snapchat would automatically go to the next one. Now with Playlist, Snapchat is having users select which stories they want to see, rather than play them all at once. Does this make for a better user experience so you aren’t watching every person’s story, many of which you don’t care about? Maybe. But it also provides potential opportunities for advertising in between these selected stories. Now without the automatic jump to the next story, Snapchat has created an avenue to sell ad space like a commercial in between stories.

    Expect more tweaks to the UI and UX as Evan Spiegel and team continue to grow the Snapchat ad platform and its potential. Especially now with competitors like Instagram Stories gunning for them.

  • Automate More, Worry Less with Automated Rules on Facebook

    screen-shot-2016-09-26-at-4-18-26-pm

    If you’re like me and don’t want to double check your Facebook ad campaigns every day to monitor certain thresholds you’ve set, such as a target Cost per Acquisition, then you will be psyched to learn about Facebook’s latest feature: Automated Rules. Automated Rules allow you to automate your campaigns to turn off when they hit certain thresholds or meet certain conditions, as well as notify you.

    screen-shot-2016-09-21-at-11-15-26-am

    For example, if you want to keep your Cost per Click under $1, but don’t want to check it every single day to monitor, using Automated Rules you can set your ad to turn off if the CPC goes over $1 as well as send you a notification about it.

    Another example that could be especially useful for Remarketing campaigns revolves around Frequency. Remarketing campaigns are obviously great for a more targeted and interested user, but with that comes a smaller audience size. With this smaller audience, it is much easier to see Frequency numbers get out of hand and have users being served the same ads over and over again, which will kill your Relevance Score. So you can now set your target threshold using Automated Rules and have your ad shut off as well as alert you if the Frequency goes higher than you’d like it.

    This could save marketers a ton of time if you manage a lot of ads and ad campaigns for larger clients, but don’t want to spend time double checking certain key metrics for every ad every day.

    Facebook is rolling this feature out now as they do with all new updates, but I only first saw it last week. So if you haven’t seen it yet, keep your eyes peeled.

  • Snapchat Just Made it Even Easier to Create Custom Geofilters

    screen-shot-2016-09-15-at-10-04-48-am

    Snapchat has just made it even easier for businesses to create their own custom Geofilters. Snapchat Geofilters are one of the best ways to quickly and easily get brand awareness. Of course just even making them for fun (or as a product to sell) works too. I recently made a Geofilter for a wedding, geofenced it to the block that the hotel was on and Bam, all my snaps had that extra flair. Plus these are super inexpensive if you are only targeting small areas, but they can get a bit pricey when targeting large parts of a city. So choose wisely as these may be better for specific events rather than an ongoing campaign based on your budget. The big update is that Snapchat now offers tools on the platform itself to create your own Geofilter without any design knowledge needed. So no more Photoshop skills necessary!

    • Go to Snapchat.com and click on the Snapchat Geofilter link at the top of the screen.

    geofilter_1


    • Click On Demand to create and schedule a Geofilter for a specific time and location.


    geofilter_2


    • Once you’re on the On-Demand Geofilter page click Create Now.


    geofilter_3


    • Review the guidelines Snapchat has laid out for best practices


    geofilter_4


    • Click Create Online (previously you would have had to build on one your own or use a generic template).


    geofilter_5


    • Welcome to the Snapchat tools section, now experiment and create something!


    geofilter_6

  • How to Uncover (Direct/None) Referral Traffic in Google Analytics

    logo_lockup_analytics_icon_horizontal_black_2x

    Have you noticed in your client’s Google Analytics that certain sources are not being identified clearly in Source traffic? One of the best ways to alleviate this issue is to use URL Parameters modifiers to essentially call out where the traffic is coming from. This helps GA tag the traffic coming in and sorting it into its own specific source, which allows you to identify and confirm the referral source.

    screen-shot-2016-09-08-at-8-01-45-pm

    This is an issue I know most marketers are aware of as (Direct/None) traffic can be a number of things. It’s not very likely that every one of your customers is typing in the long, specific URL every single time though. What’s more likely is that Google doesn’t know exactly how to sort the traffic or identify where it’s coming from.

    I recently identified this issue for a website who’s Facebook tracking wasn’t firing and Analytics wasn’t reporting much referral traffic coming from Facebook, despite plenty of paid ad clicks. So looking through GA you’re likely to notice a large portion of traffic from Direct/None and while it’s unlikely to ever uncover 100% of the unknown traffic, you can tag URL’s from traffic that you know you’re driving, to help close the loop.

    So how do you accomplish this? Below are a few quick steps to use URL Parameters to tag your traffic for GA to more easily sort. Note, this specific example was for tagging Facebook referral traffic.

    1.) Identify that your ad traffic definitely isn’t being reported accurately in Google Analytics.

    2.) Pull the URL of wherever you are driving traffic (i.e. example.com/product)

    3.) In the case of Facebook, you’ll add the following URL Parameter at the end of the url:

    ?source=facebook (i.e. example.com/product?source=facebook)

    4.) Copy and paste that URL into your browser to make sure it doesn’t cause any errors or unexpected reroutes.

    5.) After sufficient clicks on your ad using this URL Parameter, go into your Google Analytics > Behavior > Content > All Pages. This will allow you to see what pages all of your users are landing on.

    6.) Using the URL Parameter you set up earlier you can identify that specific landing page (example.com/product?source=facebook), which you’ve tagged as coming from a specific source. In this case it’s a Facebook ad, so GA will sort out that traffic and label it with the new URL so you can easily identify this traffic is in fact coming from your Facebook ad — breaking it out of the ambiguous Direct distinction.

    You’ve now uncovered your referral traffic out of (Direct/None) in Google Analytics!


  • How to Create a Facebook Sales Funnel for Your Website

    Photo via BoostLikes.com
    Photo via BoostLikes.com

    With the insane level of targeting and reporting that advertisers can access on Facebook, it would be shortsighted to not take advantage of everything available. I’m going to give a quick breakdown of an easy and effective way to create a Sales Funnel from your Facebook ad campaigns, so you can track how users are interacting with your site, what’s drawing them in and what’s driving them to convert.

    We’re going to utilize the Facebook pixel and the various Standard Events in the code to measure people coming through the funnel all the way to shopping cart abandonment and ultimately a purchase.

    So the 10 Standard Events in the Facebook Pixel allow us to identify and tag users based on what pages they’re visiting, how they’re using the site, as well as if they are bouncing out at a certain point or (hopefully) making a purchase on your site. These Standard Events are listed below:

    Screen shot 2016-08-24 at 1.58.12 PM

    Be sure to include the Standard Event line of code in your pixel for the corresponding landing page. If you want to double check or have any questions on how to edit and place the code you can refer to the Facebook Pixel Implementation Guide. The Facebook Pixel Helper is also a great Chrome extension that helps identify if your pixels are live and placed correctly on a page. Additional Pixel Troubleshooting from the Facebook developers.

    What you’ll want to do is map out the path to purchase on your website so you know which Standard Event to place on which page.
    • View Content: This is most useful if there is a specific page on your site that you identify as a key page view such as the product page, the additional info page, a landing page with more details that could lead to a purchase etc.
    • Search: This will help identify if users are getting to your site and performing searches in your search bar. If they are, but you’re still not seeing sales you may need to revisit your targeting as users may not be finding the relevant content/product that they thought they would.
    • Add to Cart: Key step to track how many people are starting the checkout process vs finishing an order. Drop offs are useful for measuring shopping cart abandonment and retargeting, but can also point out red flags in user experience if people are not converting after adding to cart.
    • Add to Wish List: A great way to track extremely interested users who maybe weren’t ready to pull the trigger yet.
    • Initiate Checkout: The strongest indicator of purchase intent and one of the main steps to measure the path to purchase.
    • Add Payment Info: Again measuring drop offs here will be key.
    • Purchase: The name of the game; tracking conversions and using that data to optimize your ads further. You can also identify the value of a sale if you have different Thank You pages for different products
    • Lead: This is useful if you are having users fill out a form, redeem a free trial etc. rather than making a purchase.
    • Complete Registration: Useful for identifying users that sign up for a service or a subscription through a registration form.
    • Other: Use this to track any other key actions on your website that aren’t listed above.

    Using these Standard Events as qualifiers, what you want to do is place the corresponding code on each page all the way from a Page View down to a Conversion. So you would have the standard pixel on the landing page, Add to Cart on the first step in the cart page, Initiate Checkout page gets its own pixel code, same for Add Payment Info and Purchase. Now if you have other relevant pages on the site then you’ll want to add the additional codes to those such as View Content for a key page view and the like.

    In the end this will help you identify how many people came into the funnel at the top, how many came out the bottom with a purchase and exactly how many dropped off and at what part of the process so you can re-engage or tweak your campaigns.